 |
| The Ava Pleated Skirt! |
Melissa here again, from
Ms Midge! I have another new pattern in my hands to review for you! I've set myself a bit of a challenge this year. I would really like to make all of my girl's skirts and dresses! I have lots of dress patterns, but only a few skirts, so went searching through the PDF's and found this beauty! It's the Ava Pleated Skirt, by Hadley Grace Designs. You can find it
HERE at
Patterns Only.
I bought some gorgeous bright light drill fabric on sale last week, so pulled it out for this project. If you pop over to The Oz Material Girls you will surely find something that will jump out and grab you. The beauty of this pattern is that you could use ANY weight fabric, so the options are endless. It also means you can make skirts for all seasons.
I don't usually print out my PDF instructions, but given this pattern doesn't actually come with pattern pieces as such, I've printed it out so I have all of the measurements in black and white. There are a couple of tables which have the measurements in inches for the size, waist, Measurements for the fabric in width & length, amount of fabric to purchase and the finished skirt length. This I find REALLY handy. Once I realised there were no pattern pieces, I was excited. This meant all I have to work with is one or two lengths of fabric.
The other AMAZING thing about this pattern is that it gives you all of the measurements for sizes NEWBORN through to size 14!! Fabulous! So the next thing I had to do was work out what size I was going to be guided by. I measured my eldest daughter's waist and decided to go by a size 9.
The next part of the instructions is "Elastic for the Waist". I must say, it took me a couple of reads to understand them! It's a little confusing, and would be much more effective for the measurements to actually be added to the tables I described above. I did figure it out though!
The directions go on to instruct you how to start putting the skirt together. Sizes 6 and under are made using one continuous length of fabric, giving it only one seam at the back. Sizes 7 and up need a front and a back length, giving it two side seams. There is no SEAM ALLOWANCE mentioned in the instructions. I flicked through the rest of the instructions and found a half inch seam allowance mentioned near the end, so went with that!
Instructions then begin for how to assemble the pleats in the skirt. I am feeling a little silly by this stage, because I am having to read this a few times again! Eventually it clicks - The instructions really are aimed at making up to a size 6. Because when you start making them 7+, it differs due to having two lengths of fabric instead of the one. Again, I figure it out!
Here's a tip that I found out the "hard way". Measure the half way mark on the front piece of your skirt and mark it BEFORE you sew the side seam together. I did it the other way around and when I went to sew the other side seam up after adding the pleats, I realised it was not even, so ended up taking it in a bit to even it up.
How to assemble the pleats was really quite easy to follow (phew) and I had them all pinned beautifully. The instructions suggest that the pleats should be 4" apart, and "for sizes 2 up to about a size 6, 5 pleats are probably perfect. For the bigger sized skirts you will probably need to add 7 or 9 pleats." This simply does not work. I made a size 9 skirt. And there was only enough room to fit 5 pleats! So it does beg the question on how you would fit 5 pleats on a teeny size? I'm guessing you would have to make the size of the pleats smaller as well as the spacing between them?
 |
| Not much room left for any more than 5 pleats. |
Something new I learnt, and loved from this pattern was the double seam at the hem. It looks fabulous!
Last, but not least, were the instructions on how to finish the waist. This pattern has a flat front, which is gorgeous, and an elasticised back. I altered the way I did this. The instructions direct you to sew all around the waist, leaving only a 3" opening for the elastic. This is how I did it:
 |
| I sewed all around the front half of the skirt first. I then started sewing the back of the skirt, leaving about an inch open at each end of the casing. |
 |
| Start threading the elastic through one end. |
 |
| When you have almost pulled it through.... |
 |
| Slide the end of the elastic up against the side seam. |
 |
| And pin in place. |
 |
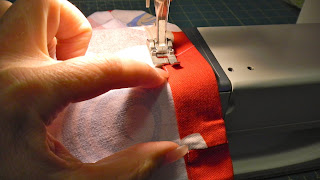
| Then sew down over the elastic and back again to ensure it is strong. |
 |
| Sew up the open part of the casing. Then thread the rest of the elastic through to the other end. |
 |
| If you have the child on hand, try the skirt on! I used the elastic measurements in the pattern for the size 9, and it turns out I had quite a bit of elastic spare! So I pinned it to where it fitted my daughter, then trimmed off the excess elastic. |
 |
| Slide the elastic up against the side seam again, making sure it's pinned in place so it doesn't slip out! |
 |
And this is what it looks like all closed up!
All in all - a really great and EASY skirt to make! And once again, I have done something new - PLEATS! This is a really fabulous little pattern, once you wrap your head around a few of the instructions. As with most patterns, it's always going to be better if you have your model nearby to check the finished size. As I discovered earlier. The finished product looks gorgeous on, and I will definitely be making lots more! |
 |
| Close up of the pleats. |
|
| The Ava Pleated Skirt! |
*** I'm editing this a few days after writing it! I have now made a size one in the pattern and got a little muddled by the sizing chart. In the end I just took a bit of a punt of the measurements for the fabric, and made the pleats closer together (2 inches) and it worked beautifully.


I have to say, I LOVE your pins! So cute :) Great review!
ReplyDelete